Forum, where you can know more about Injection: http://yoko.netroof.net/forum
AoS players (clients 400+, RunUO) must read that first: http://yoko.netroof.net/forum/viewtopic.php?t=73
Commands, main help on Injection: http://yoko.netroof.net/help
Version of Injection you may download here is a player-side helper tool, developed to scripting and automation some actions like arming, dressing, potion drinking etc. If you think you need some exploits, bugs etc. you need to seek other tools, like pGdE Injection. I myself do not support buggers, and do not spread such programms.
If your requests limited to arming, dressing and simple macroes then you need simle and safe UO Assist. I'm reccomend it also those who lack imagination and abstract thinking.
Variant 1: original version without my additions. In this case open file branch of http://injection.sourcefore.net and download NOT signed by Yoko version. Also site contains old documentation.
Variant 2: Yoko Injection. In this case you need following 3 files (for updating only first one):
| Description | Mirror 1 | Mirror 2 |
|---|---|---|
| Yoko Injection DLL (latest version) | http://yoko.netroof.net/Injection.zip | http://yoko.com.ua/Injection.zip |
| Launcher files | http://yoko.netroof.net/inj-base.zip | http://yoko.com.ua/inj-base.zip |
| Script module | http://yoko.netroof.net/script.zip | http://yoko.com.ua/script.zip |
Maybe you interrested in documents pack related to Injection:
| Description | Mirror 1 | Mirror 2 |
|---|---|---|
| Injection-related documents pack | http://yoko.netroof.net/YokoDoc.zip | http://yoko.com.ua/YokoDoc.zip |
Variant 3: you already have some sort of Injection. In this case it is enough to download Yoko Injection DLL.
Warning: if you done some ilpatch.cfg changes, save your file because it will be rewritten from downloaded archive.
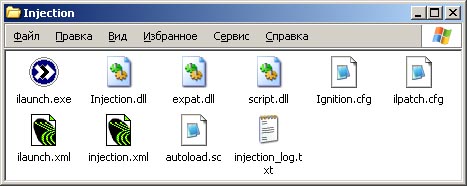
Image showing Injection files (top row - obligatory)

Before starting setting up, you must know:
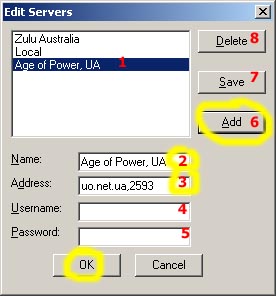
Execute ilauncher.exe

 1 - server list
2 - changed/new name
3 - changed/new address
4 - changed/new login (not needed)
5 - changed/new password (not needed)
6 - add new server entry with data in fields 2-5
7 - change selected entry in 1 to new data 2-5
8 - remove selected in 1 server
For first time you need:
Be aware, if you use HTTP Port to work through proxy-server, then address must be entered 127.0.0.1 and real address in HTTP Port redirection settings. See also about HTTP Port there http://yoko.netroof.net/forum/viewtopic.php?t=49
After new data input, 2a contents reset, so choose server again in 2c
 1 - client list
2à - changed/new client path
2b - button to browse for client file
2c - new/changed client name
3 - add new client entry with data 2a, 2c
4 - change data of selected in 1 client to 2a, 2c
5 - remove selected in 1 client
For first time you need:
After data input field 3a reset, so chose client ib 3c again.

here displayed items you check before press Launch
If following error appeared (numbers differ in situation):

then read and use to remove error this topic: http://yoko.netroof.net/forum/viewtopic.php?t=74
Remember that you need use Variant 1 to patch file, Variant 2 is only last method
you must try.
This error surely appeared if you used YA
MUU (for multi UO instances) and/or
UO Rice (to remove encryption).
If other errors appeared, check up steps triple, then if it still appears read this: http://yoko.netroof.net/forum/viewforum.php?f=2
 At
first look at your client version in bottom of client window.
If version started on 4.0. and other then 4.0.0a, 4.0.0b, 4.0.0c then
you can not log in your shard (most possibly RunUO).
To log in read very attentively this topic: http://yoko.netroof.net/forum/viewtopic.php?t=73
 The
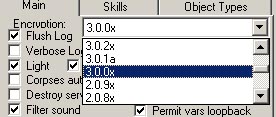
main thing you need is to set up proper Encryption, elsewhere you can not login.
Encryption signed 1. "None (Ignition)" means no encryption at all (for example RunUO or Wolfpack). In most shards Encryption must be the same as client version you see in UO window. Version faking (2) is NOT Encryption (1).
 Example: if
you downloaded client 3.0.0ñ then you must set up Encryption 3.0.0x
(x means any letter)
Remember that RunUO, Wolfpack shards, and those where stated to use client without encryption (UO Rice) encryption "None (Ignition)" is used.
If you do not know how to handle options at Main tab, for first time use this picture. Only you need obligatory is to set up Encryption as described above. Yellow color sign important options very reccomended to set as on picture unless you clearly understand what to do.
For client versions 4.0.0a-4.0.0c you must enable IgnoreSocket(400x) options and in Version Faking option (2) input version, that your shard awaiting (for example 4.0.1a)
Sometimes Version Faking needed to use if you use other client, that your shard expects.
After all option setted as needed, press Save button to save changes. This reccomended each time you change something, because Injection trying to save options automatically only on exit, and succeed this not always.
In case you still can not login: